The x86 platform has been ever so slowly moving towards a world where EFI is used to boot everything, with legacy BIOS put out to pasture. Virtual machines in general have been somewhat behind the cutting edge in this respect though. This has mostly been due to the virtualization and cloud platforms being somewhat slow in enabling use of EFI at all, let alone making it the default. In a great many cases the platforms still default to using BIOS unless explicitly asked to use EFI. With this in mind most the mainstream distros tend to provide general purpose disk images built such that they can boot under either BIOS or EFI, thus adapting to whatever environment the user deploys them in.
In recent times there is greater interest in the use of TPM sealing and SecureBoot for protecting guest secrets (eg LUKS passphrases), the introduction of UKIs as the means to extend the SecureBoot signature to close initrd/cmdline hole, and the advent of confidential virtualization technology. These all combine to increase the liklihood that a virtual machine image will exclusively target EFI, fully discontinuing support for legacy BIOS.
This presents a bit of a usability trapdoor for people deploying images though, as it has been taken for granted that BIOS boot always works. If one takes an EFI only disk image and attempts to boot it via legacy BIOS, the user is likely to get an entirely blank graphical display and/or serial console, with no obvious hint that EFI is required. Even if the requirement for EFI is documented, it is inevitable that users will make mistakes.
Can we do better than this ? Of course we can.
Enter ‘Bye Bye BIOS‘ (https://gitlab.com/berrange/byebyebios)
This is a simple command line tool that, when pointed to a disk image, will inject a MBR sector that prints out a message to the user on the primary VGA display and serial port informing them that UEFI is required, then puts the CPUs in a ‘hlt‘ loop.
The usage is as follows, with a guest serial port connected to the local terminal:
$ byebyebios test.img
$ qemu-system-x86_64 \
    -blockdev driver=file,filename=test.img,node-name=img \
    -device virtio-blk,drive=img \
    -m 2000 -serial stdio

STOP: Machine was booted from BIOS or UEFI CSM
 _    _         _   _ ___________ _____   ___
| \  | |       | | | |  ___|  ___|_   _| |__ \
|  \ | | ___   | | | | |__ | |_    | |      ) |
| . `  |/ _ \  | | | |  __||  _|   | |     / /
| |\   | (_) | | |_| | |___| |    _| |_   |_|
\_| \_/ \___/   \___/\____/\_|    \___/   (_)

Installation requires UEFI firmware to boot
Meanwhile the graphical console shows the same:

QEMU showing “No UEFI” message when booted from BIOS
The message shown here is a default, but it can be customized by pointing to an alternative message file
$ echo "Bye Bye BIOS" | figlet -f bubble | unix2dos > msg.txt
$ byebyebios --message msg.txt test.img
$ qemu-system-x86_64 \
    -blockdev driver=file,filename=test.img,node-name=img \
    -device virtio-blk,drive=img \
    -m 2000 -serial stdio

  _   _   _     _   _   _     _   _   _   _
 / \ / \ / \   / \ / \ / \   / \ / \ / \ / \
( B | y | e ) ( B | y | e ) ( B | I | O | S )
 \_/ \_/ \_/   \_/ \_/ \_/   \_/ \_/ \_/ \_/
The code behind this is simplicity itself, just a short piece of x86 asm
$ cat bootstub.S
# SPDX-License-Identifier: MIT-0

.code16
.global bye_bye_bios

bye_bye_bios:
  mov $something_important, %si
  mov $0xe, %ah
  mov $0x3f8,%dx

say_a_little_more:
  lodsb
  cmp $0, %al
  je this_is_the_end
  int $0x10
  outb %al,%dx
  jmp say_a_little_more

this_is_the_end:
  hlt
  jmp this_is_the_end

something_important:
# The string message will be appended here at time of install
This is compiled with the GNU assembler to create a i486 ELF object file
$ as -march i486 -mx86-used-note=no --32 -o bootstub.o bootstub.S
From this ELF object file we have to extract the raw machine code bytes
$ ld -m elf_i386 --oformat binary -e bye_bye_bios -Ttext 0x7c00 -o bootstub.bin bootstub.o
The byebyebios python tool takes this bootstub.bin, appends the text message and NUL terminator, padding to fill 446 bytes, then adds a dummy partition table and boot signature to fill the whole 512 sector.
With the boot stub binary at 21 bytes in size, this leaves 424 bytes available for the message to display to the user, which is ample for the purpose.
In conclusion, if you need to ship an EFI only virtual machine image, do your users a favour and use byebyebios to add a dummy MBR to tell them that the image is EFI only when they inevitably make a mistake and run it under legacy BIOS.
With the various CPU hardware vulnerabilities reported this year, guest CPU configuration is now a security critical task. This blog post contains content I’ve written that is on its way to become part of the QEMU documentation.
QEMU / KVM virtualization supports two ways to configure CPU models
- Host passthrough
- This passes the host CPU model features, model, stepping, exactly to the guest. Note that KVM may filter out some host CPU model features if they cannot be supported with virtualization. Live migration is unsafe when this mode is used as libvirt / QEMU cannot guarantee a stable CPU is exposed to the guest across hosts. This is the recommended CPU to use, provided live migration is not required.
- Named model
- QEMU comes with a number of predefined named CPU models, that typically refer to specific generations of hardware released by Intel and AMD. These allow the guest VMs to have a degree of isolation from the host CPU, allowing greater flexibility in live migrating between hosts with differing hardware.
In both cases, it is possible to optionally add or remove individual CPU features, to alter what is presented to the guest by default.
Libvirt supports a third way to configure CPU models known as “Host model”. This uses the QEMU “Named model” feature, automatically picking a CPU model that is similar the host CPU, and then adding extra features to approximate the host model as closely as possible. This does not guarantee the CPU family, stepping, etc will precisely match the host CPU, as they would with “Host passthrough”, but gives much of the benefit of passthrough, while making live migration safe.
Recommendations for KVM CPU model configuration on x86 hosts
The information that follows provides recommendations for configuring CPU models on x86 hosts. The goals are to maximise performance, while protecting guest OS against various CPU hardware flaws, and optionally enabling live migration between hosts with hetergeneous CPU models.
Preferred CPU models for Intel x86 hosts
The following CPU models are preferred for use on Intel hosts. Administrators / applications are recommended to use the CPU model that matches the generation of the host CPUs in use. In a deployment with a mixture of host CPU models between machines, if live migration compatibility is required, use the newest CPU model that is compatible across all desired hosts.
Skylake-ServerSkylake-Server-IBRS- Intel Xeon Processor (Skylake, 2016)
Skylake-ClientSkylake-Client-IBRS- Intel Core Processor (Skylake, 2015)
BroadwellBroadwell-IBRSBroadwell-noTSXBroadwell-noTSX-IBRS- Intel Core Processor (Broadwell, 2014)
HaswellHaswell-IBRSHaswell-noTSXHaswell-noTSX-IBRS- Intel Core Processor (Haswell, 2013)
IvyBridgeIvyBridge-IBRS- Intel Xeon E3-12xx v2 (Ivy Bridge, 2012)
SandyBridgeSandyBridge-IBRS- Intel Xeon E312xx (Sandy Bridge, 2011)
WestmereWestmere-IBRS- Westmere E56xx/L56xx/X56xx (Nehalem-C, 2010)
NehalemNehalem-IBRS- Intel Core i7 9xx (Nehalem Class Core i7, 2008)
Penryn- Intel Core 2 Duo P9xxx (Penryn Class Core 2, 2007)
Conroe- Intel Celeron_4x0 (Conroe/Merom Class Core 2, 2006)
Important CPU features for Intel x86 hosts
The following are important CPU features that should be used on Intel x86 hosts, when available in the host CPU. Some of them require explicit configuration to enable, as they are not included by default in some, or all, of the named CPU models listed above. In general all of these features are included if using “Host passthrough” or “Host model”.
pcid- Recommended to mitigate the cost of the Meltdown (CVE-2017-5754) fix. Included by default in Haswell, Broadwell & Skylake Intel CPU models. Should be explicitly turned on for Westmere, SandyBridge, and IvyBridge Intel CPU models. Note that some desktop/mobile Westmere CPUs cannot support this feature.
spec-ctrl- Required to enable the Spectre (CVE-2017-5753 and CVE-2017-5715) fix, in cases where retpolines are not sufficient. Included by default in Intel CPU models with -IBRS suffix. Must be explicitly turned on for Intel CPU models without -IBRS suffix. Requires the host CPU microcode to support this feature before it can be used for guest CPUs.
ssbd- Required to enable the CVE-2018-3639 fix. Not included by default in any Intel CPU model. Must be explicitly turned on for all Intel CPU models. Requires the host CPU microcode to support this feature before it can be used for guest CPUs.
pdpe1gb- Recommended to allow guest OS to use 1GB size pages.Not included by default in any Intel CPU model. Should be explicitly turned on for all Intel CPU models. Note that not all CPU hardware will support this feature.
Preferred CPU models for AMD x86 hosts
The following CPU models are preferred for use on Intel hosts. Administrators / applications are recommended to use the CPU model that matches the generation of the host CPUs in use. In a deployment with a mixture of host CPU models between machines, if live migration compatibility is required, use the newest CPU model that is compatible across all desired hosts.
EPYCEPYC-IBPB- AMD EPYC Processor (2017)
Opteron_G5- AMD Opteron 63xx class CPU (2012)
Opteron_G4- AMD Opteron 62xx class CPU (2011)
Opteron_G3- AMD Opteron 23xx (Gen 3 Class Opteron, 2009)
Opteron_G2- AMD Opteron 22xx (Gen 2 Class Opteron, 2006)
Opteron_G1- AMD Opteron 240 (Gen 1 Class Opteron, 2004)
Important CPU features for AMD x86 hosts
The following are important CPU features that should be used on AMD x86 hosts, when available in the host CPU. Some of them require explicit configuration to enable, as they are not included by default in some, or all, of the named CPU models listed above. In general all of these features are included if using “Host passthrough” or “Host model”.
ibpb- Required to enable the Spectre (CVE-2017-5753 and CVE-2017-5715) fix, in cases where retpolines are not sufficient. Included by default in AMD CPU models with -IBPB suffix. Must be explicitly turned on for AMD CPU models without -IBPB suffix. Requires the host CPU microcode to support this feature before it can be used for guest CPUs.
virt-ssbd- Required to enable the CVE-2018-3639 fix. Not included by default in any AMD CPU model. Must be explicitly turned on for all AMD CPU models. This should be provided to guests, even if amd-ssbd is also provided, for maximum guest compatibility. Note for some QEMU / libvirt versions, this must be force enabled when when using “Host model”, because this is a virtual feature that doesn’t exist in the physical host CPUs.
amd-ssbd- Required to enable the CVE-2018-3639 fix. Not included by default in any AMD CPU model. Must be explicitly turned on for all AMD CPU models. This provides higher performance than virt-ssbd so should be exposed to guests whenever available in the host. virt-ssbd should none the less also be exposed for maximum guest compatability as some kernels only know about virt-ssbd.
amd-no-ssb- Recommended to indicate the host is not vulnerable CVE-2018-3639. Not included by default in any AMD CPU model. Future hardware genarations of CPU will not be vulnerable to CVE-2018-3639, and thus the guest should be told not to enable its mitigations, by exposing amd-no-ssb. This is mutually exclusive with virt-ssbd and amd-ssbd.
pdpe1gb- Recommended to allow guest OS to use 1GB size pages. Not included by default in any AMD CPU model. Should be explicitly turned on for all AMD CPU models. Note that not all CPU hardware will support this feature.
Default x86 CPU models
The default QEMU CPU models are designed such that they can run on all hosts. If an application does not wish to do perform any host compatibility checks before launching guests, the default is guaranteed to work.
The default CPU models will, however, leave the guest OS vulnerable to various CPU hardware flaws, so their use is strongly discouraged. Applications should follow the earlier guidance to setup a better CPU configuration, with host passthrough recommended if live migration is not needed.
qemu32qemu64- QEMU Virtual CPU version 2.5+ (32 & 64 bit variants). qemu64 is used for x86_64 guests and qemu32 is used for i686 guests, when no -cpu argument is given to QEMU, or no <cpu> is provided in libvirt XML.
Other non-recommended x86 CPUs
The following CPUs models are compatible with most AMD and Intel x86 hosts, but their usage is discouraged, as they expose a very limited featureset, which prevents guests having optimal performance.
kvm32kvm64- Common KVM processor (32 & 64 bit variants). Legacy models just for historical compatibility with ancient QEMU versions.
486athlonphenomcoreduocore2duon270pentiumpentium2pentium3- Various very old x86 CPU models, mostly predating the introduction of hardware assisted virtualization, that should thus not be required for running virtual machines.
Syntax for configuring CPU models
The example below illustrate the approach to configuring the various CPU models / features in QEMU and libvirt
QEMU command line
- Host passthrough
-
$ qemu-system-x86_64 -cpu host
With feature customization:
$ qemu-system-x86_64 -cpu host,-vmx,...
- Named CPU models
-
$ qemu-system-x86_64 -cpu Westmere
With feature customization:
$ qemu-system-x86_64 -cpu Westmere,+pcid,...
Libvirt guest XML
- Host passthrough
-
<cpu mode='host-passthrough'/>
With feature customization:
   <cpu mode='host-passthrough'>
       <feature name="vmx" policy="disable"/>
       ...
   </cpu>
- Host model
-
With feature customization:
   <cpu mode='host-model'>
       <feature name="vmx" policy="disable"/>
       ...
   </cpu>
- Named model
-
   <cpu mode='custom'>
       <model>Westmere</model>
   </cpu>
With feature customization:
   <cpu mode='custom'>
       <model>Westmere</model>
       <feature name="pcid" policy="require"/>
       ...
   </cpu>
In recent times I have been aggressively working to expand the coverage of libvirt XML schemas in the libvirt-go-xml project. Today this work has finally come to a conclusion, when I achieved what I believe to be effectively 100% coverage of all of the libvirt XML schemas. More on this later, but first some background on Go and XML….
For those who aren’t familiar with Go, the core library’s encoding/xml module provides a very easy way to consume and produce XML documents in Go code. You simply define a set of struct types and annotate their fields to indicate what elements & attributes each should map to. For example, given the Go structs:
type Person struct {
    XMLName xml.Name `xml:"person"`
    Name string `xml:"name,attr"`
    Age string `xml:"age,attr"`
    Home *Address `xml:"home"`
    Office *Address `xml:"office"`
}
type Address struct {
    Street string `xml:"street"`
    City string `xml:"city"`
}
You can parse/format XML documents looking like
<person name="Joe Blogs" age="24">
  <home>
    <street>Some where</street><city>London</city>
  </home>
  <office>
    <street>Some where else</street><city>London</city>
  </office>
</person>
Other programming languages I’ve used required a great deal more work when dealing with XML. For parsing, there’s typically a choice between an XML stream based parser where you have to react to tokens as they’re parsed and stuff them into structs, or a DOM object hierarchy from which you then have to pull data out into your structs. For outputting XML, apps either build up a DOM object hierarchy again, or dynamically format the XML document incrementally. Whichever approach is taken, it generally involves writing alot of tedious & error prone boilerplate code. In most cases, the Go encoding/xml module eliminates all the boilerplate code, only requiring the data type defintions. This really makes dealing with XML a much more enjoyable experience, because you effectively don’t deal with XML at all! There are some exceptions to this though, as the simple annotations can’t capture every nuance of many XML documents. For example, integer values are always parsed & formatted in base 10, so extra work is needed for base 16. There’s also no concept of unions in Go, or the XML annotations. In these edge cases custom marshaling / unmarshalling methods need to be written. BTW, this approach to XML is also taken for other serialization formats including JSON and YAML too, with one struct field able to have many annotations so it can be serialized to a range of formats.
Back to the point of the blog post, when I first started writing Go code using libvirt it was immediately obvious that everyone using libvirt from Go would end up re-inventing the wheel for XML handling. Thus about 1 year ago, I created the libvirt-go-xml project whose goal is to define a set of structs that can handle documents in every libvirt public XML schema. Initially the level of coverage was fairly light, and over the past year 18 different contributors have sent patches to expand the XML coverage in areas that their respective applications touched. It was clear, however, that taking an incremental approach would mean that libvirt-go-xml is forever trailing what libvirt itself supports. It needed an aggressive push to achieve 100% coverage of the XML schemas, or as near as practically identifiable.
Alongside each set of structs we had also been writing unit tests with a set of structs populated with data, and a corresponding expected XML document. The idea for writing the tests was that the author would copy a snippet of XML from a known good source, and then populate the structs that would generate this XML. In retrospect this was not a scalable approach, because there is an enourmous range of XML documents that libvirt supports. A further complexity is that Go doesn’t generate XML documents in the exact same manner. For example, it never generates self-closing tags, instead always outputting a full opening & closing pair. This is semantically equivalent, but makes a plain string comparison of two XML documents impractical in the general case.
Considering the need to expand the XML coverage, and provide a more scalable testing approach, I decided to change approach. The libvirt.git tests/ directory currently contains 2739 XML documents that are used to validate libvirt’s own native XML parsing & formatting code. There is no better data set to use for validating the libvirt-go-xml coverage than this. Thus I decided to apply a round-trip testing methodology. The libvirt-go-xml code would be used to parse the sample XML document from libvirt.git, and then immediately serialize them back into a new XML document. Both the original and new XML documents would then be parsed generically to form a DOM hierarchy which can be compared for equivalence. Any place where documents differ would cause the test to fail and print details of where the problem is. For example:
$ go test -tags xmlroundtrip
--- FAIL: TestRoundTrip (1.01s)
	xml_test.go:384: testdata/libvirt/tests/vircaps2xmldata/vircaps-aarch64-basic.xml: \
            /capabilities[0]/host[0]/topology[0]/cells[0]/cell[0]/pages[0]: \
            element in expected XML missing in actual XML
This shows the filename that failed to correctly roundtrip, and the position within the XML tree that didn’t match. Here the NUMA cell topology has a ‘<pages>‘ element expected but not present in the newly generated XML. Now it was simply a matter of running the roundtrip test over & over & over & over & over & over & over……….& over & over & over, adding structs / fields for each omission that the test identified.
After doing this for some time, libvirt-go-xml now has 586 structs defined containing 1816 fields, and has certified 100% coverage of all libvirt public XML schemas. Of course when I say 100% coverage, this is probably a lie, as I’m blindly assuming that the libvirt.git test suite has 100% coverage of all its own XML schemas. This is certainly a goal, but I’m confident there are cases where libvirt itself is missing test coverage. So if any omissions are identified in libvirt-go-xml, these are likely omissions in libvirt’s own testing.
On top of this, the XML roundtrip test is set to run in the libvirt jenkins and travis CI systems, so as libvirt extends its XML schemas, we’ll get build failures in libvirt-go-xml and thus know to add support there to keep up.
In expanding the coverage of XML schemas, a number of non-trivial changes were made to existing structs defined by libvirt-go-xml. These were mostly in places where we have to handle a union concept defined by libvirt. Typically with libvirt an element will have a “type” attribute, whose value then determines what child elements are permitted. Previously we had been defining a single struct, whose fields represented all possible children across all the permitted type values. This did not scale well and gave the developer no clue what content is valid for each type value. In the new approach, for each distinct type attribute value, we now define a distinct Go struct to hold the contents. This will cause API breakage for apps already using libvirt-go-xml, but on balance it is worth it get a better structure over the long term. There were also cases where a child XML element previously represented a single value and this was mapped to a scalar struct field. Libvirt then added one or more attributes on this element, meaning the scalar struct field had to turn into a struct field that points to another struct. These kind of changes are unavoidable in any nice manner, so while we endeavour not to gratuitously change currently structs, if the libvirt XML schema gains new content, it might trigger further changes in the libvirt-go-xml structs that are not 100% backwards compatible.
Since we are now tracking libvirt.git XML schemas, going forward we’ll probably add tags in the libvirt-go-xml repo that correspond to each libvirt release. So for app developers we’ll encourage use of Go vendoring to pull in a precise version of libvirt-go-xml instead of blindly tracking master all the time.
Quite by chance today I discovered that Fedora 27 can display full colour glyphs for unicode characters that correspond to emojis, when the terminal displaying my mutt mail reader displayed someone’s name with a full colour glyph showing stars:

Mutt in GNOME terminal rendering color emojis in sender name
Chatting with David Gilbert on IRC I learnt that this is a new feature in Fedora 27 GNOME, thanks to recent work in the GTK/Pango stack. David then pointed out this works in libvirt, so I thought I would illustrate it.
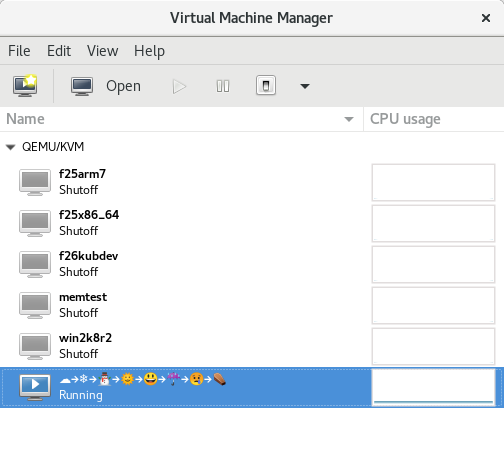
Virtual machine name with full colour emojis rendered
No special hacks were required to do this, I simply entered the emojis as the virtual machine name when creating it from virt-manager’s wizard
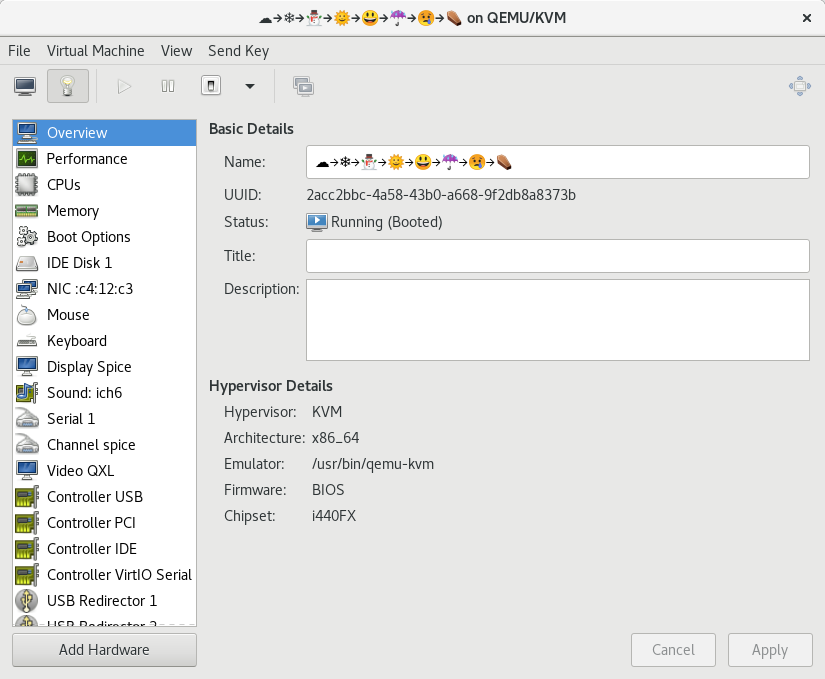
Virtual machine name with full colour emojis rendered
As mentioned previously, GNOME terminal displays colour emojis, so these virtual machine names appear nicely when using virsh and other command line tools
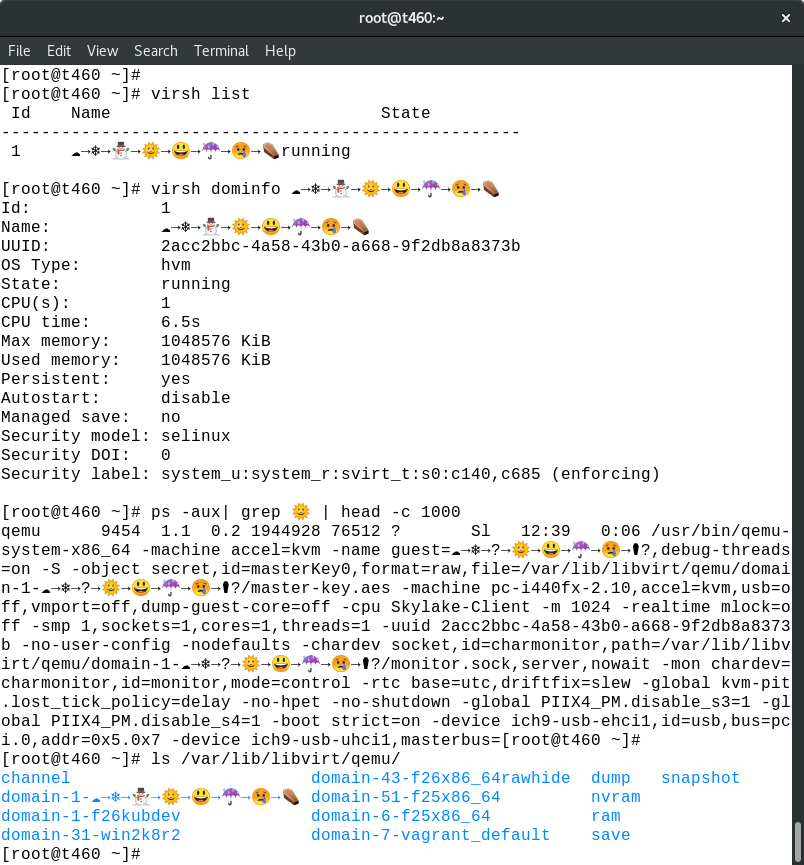
Virtual machine name rendered with full colour emojis in terminal commands
The more observant readers will notice that the command line args have a bug as the snowman in the machine name is incorrectly rendered in the process listing. The actual data in /proc/$PID/cmdline is correct, so something about the “ps” command appears to be mangling it prior to output. It isn’t simply a font problem because other comamnds besides “ps” render properly, and if you grep the “ps” output for the snowman emoji no results are displayed.
I am happy to announce a new release of libosinfo version 1.1.0 is now available, signed with key DAF3 A6FD B26B 6291 2D0E 8E3F BE86 EBB4 1510 4FDF (4096R). All historical releases are available from the project download page.
Changes in this release include:
- Force UTF-8 locale for new glib-mkenums
- Avoid python warnings in example program
- Misc test suite updates
- Fix typo in error messages
- Remove ISO header string padding
- Disable bogus gcc warning about unsafe loop optimizations
- Remove reference to fedorahosted.org
- Don’t hardcode /usr/bin/perl, use /usr/bin/env
- Support eject-after-install parameter in OsinfoMedia
- Fix misc warnings in docs
- Fix error propagation when loading DB
- Add usb.ids / pci.ids locations for FreeBSD
- Don’t include private headers in gir/vapi generation
Thanks to everyone who contributed towards this release.